The Crypt of the Phantasm : Skinning
The next thing to do is cut the foam that will go around the crypt enclosure. Once it is cut, it will be carved and painted to look like stone, but first, you need all the pieces ready.
We used a utility knife to cut the foam. It helps to have a straightedge handy for precise cuts (like the hinged part of the roof), but since you are going for a rough-hewn stone look, don't fret too much about getting perfectly straight lines on your other cuts - you're just going to be carving them into irregular shapes anyway.
Skinning the Crypt
|
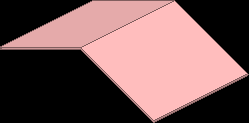
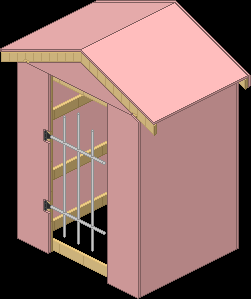
10. Make the roofThe roof is very easy to make. Since the gabled areas are 4'x4', we can simply cut a 4'x8' sheet of foam in half to form each side of the roof. Once they're cut apart, reattach them with a long strip of duct tape on one side. This will act as a hinge. If you don't like the long groove along the top, lay the hinged roof on the gable assembly so that it falls flat on the gable supports, and duct tape the other side. This will make your gable roof so that it cannot be folded, but the roof will look better. (Whether you do this is probably going to depend on whether anyone will be able to see the roof, and whether you will be able to store the foam roof on top of the gable assembly.) |
|
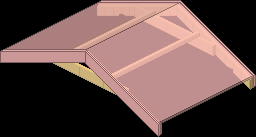
11. Make the roof runnersNext, you'll want the foam pieces that will cover up the gable support beams on the roof assembly. We found it is easiest to do this by placing the gable assembly with the back side flat on the ground, and propping the roof foam pieces up against the gable assembly. Once you have the assembly on the ground, you can lift it up and carefully lower it onto a sheet of foam to trace around the edges. These pieces should overlap the roof foam and hang down a bit below the gables. They should not follow the notches you cut to place it on the frame (indeed, the primary purpose of these foam pieces is to hide the notches). Cut out the traced areas, and hold them up to the assembly to make sure they fit nicely. |
|
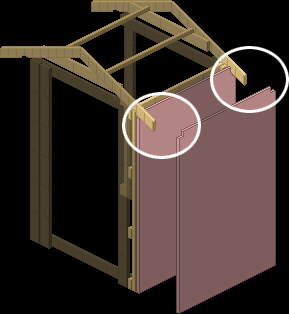
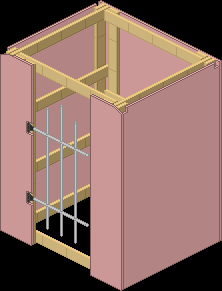
12. Make the left and right wallsNext, prepare the left and right walls. These walls are fairly straightforward, because they measure 4'x6', so all you have to do is cut off one of the foam sheets at six feet. However, because the gable assembly fits down on the notches you cut earlier, you need to cut some small notches in the foam walls to accommodate where the gable assembly drops down over the wood. Since this part is going to be largely hidden, you can just "eyeball it" and cut it freeform. Just go slowly and keep testing the foam up against your crypt frame until it fits. |
|
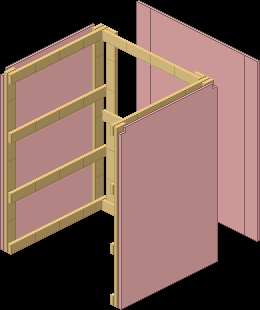
13. Make the back wallNow that you have your left and right walls, you can measure the entire width of the crypt for the back wall. You're going to need more than one sheet of foam to cover the back wall. The back wall frame, like the others, is only 4' wide, but you also need to cover the thickness of the left and right wall assembly and the foam walls. What we did was just cut off a 4'x8' sheet of foam at six feet to form the center part of the back wall. Then, we cut two thin strips to go on either side to fill the back width, and duct taped them in place on the inside-facing part of the foam. (The reason we did two instead of one is so that we could incorporate the cut into the design of the foam carving later, and still have it be symmetrical. A smidge more work, but worth it. The vertical stripes ended up being decorative columns of brickwork.) |
|
14. Make the front wallsThe front walls can be made now. Like the other walls, these will be about 6' tall. To get the width of each of the two front wall sections, start with the wall on the gate hinge side. Measure from the left wall foam to the edge of the hinge support beam to get your wall width, and duplicate that wall width for the other side. Note that these parts need to accommodate the roof runners you made in the steps above, so the outer upper corners are going to have to be trimmed. The easiest way to find the right trim is to set up the gable structure on the crypt with all the foam, and just trace the actual edge of the roof runner. Also, cut notches to accommodate the gate hinge. |
|
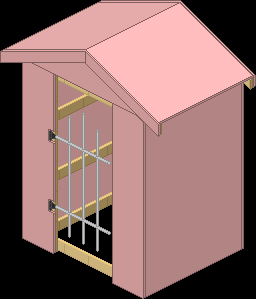
15. Make the detail panelsThe only foam walls left to cut are the two detail panels that sit just under the gable assembly beams and sit on top of the front and back wall assemblies. These triangular pieces of foam should be cut to fit snugly into their spaces, as they will probably be looked at - these panels are good places to add detail to your crypt. The best way to get a good fit is to do the same thing you did to make the gable covers - turn the assembly on its side and trace the outlines needed. |
|
16. Try it outYou don't want to get these walls all painted before you find that you need to go back and re-cut some foam, so set the entire thing up and see how it works. If it all fits together, great! If not, go back to the shop and tinker with it until you get it right. When you're done, you're ready to start painting pieces! |