The Magic Mirror: Framing
Building the support panels
|
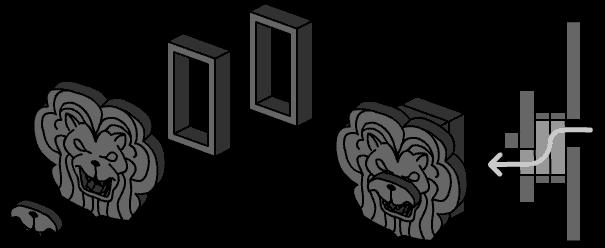
Our design only calls for our facade to be six feet tall, so the first thing to do after transferring the design is to use the jigsaw to cut the top of the MDF pieces to the right height. Be sure to take all the proper safety precautions such as wearing safety glasses and being careful around the blades. We then cut the second piece of MDF down the middle to create the two 'wings'. Cut the 2'x2' strips to fit the edges of the support panels and screw them in using the wood screws. This yields the three panels that will form the support structure for our facade, with support beams and a place to screw the hinges into. In our design, we didn't need crossbars for the center piece, since the shelving unit would provide the support, but we cut crossbars for the top and bottom of the wings (not shown in picture). |

|
Step Four: Build the facade exterior
The next step is to work the foam into the textured exterior of the facade. Melting foam releases dangerous fumes, so be sure to work in a well-ventilated area, and wear a safety mask.
Use the foam cutter to cut out the foam shapes you need. We found that you don't have to be perfect in this, since we're going for a rough-hewn stone look anyway.
Once you have the foam cut out, detail it with the wood burner. If you have enough detail in your pattern, this is largely just a matter of sketching over the pattern again with the wood burner. I liked to add a crack in the stone here and there to give it an aged look.
The lion's head was built out of two layers of foam: one for the head and mane, and one for the snout to give it a little depth. We didn't want the trick-or-treaters looking directly into the tube we were going to use to pipe the fog into the mouth, so we added two spacer layers of foam behind that to give the fog a path to travel from the hole in the facade, down a short corridor, and out the mouth:
We shaped the lion's snout using the foam cutter so it wasn't just a block.
At this point, you can also build the basin. We used three layers of foam, one cut to be the bottom of the basin, and the other two layered on as the border of the basin. (For the bottom of the basin, we could conveniently use the oval piece of foam we cut out to leave a hole for the mirror.)
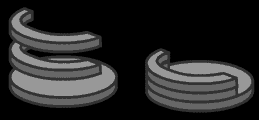
Note that for the basin's bottom, we have a complete ellipse, not just half of one. This way, we can slide the 'flat' half into a slot in the facade, set it on a shelf of the shelving unit, and weigh it down to give it some real rigidity. This is because this is the one piece of the facade we expect kids to touch. We actually went so far as to cut a piece of MDF to fit the bottom of the basin so it would be very sturdy - again, we could conveniently use the oval piece of MDF left over from the hole for the mirror.
Once the basin was constructed, it was a simple matter to use the foam cutter to smooth the layered edges, and then use the wood burner to made a stonework pattern in the resultant form.